Ready to Get Your VFD Solution?
Whether you need a single drive or a complete system, we have the VFD products and engineering support to ensure your project's success.

Following VFD installation best practices is the difference between a drive that runs for 15 years and one that fails in 15 months. These practices cover mounting, wiring, grounding, EMC, and commissioning rules that keep a Variable Frequency Drive (VFD) and its motor running reliably for years. Ignore them, and you are more likely to see nuisance trips, PLC lockups, premature bearing failure, and safety violations than smooth speed control.
Why does this matter so much? Roughly 80% of VFD field problems trace back to improper grounding or cable shielding, not a defective drive. Most of these issues are preventable with disciplined installation habits.
This VFD installation guide covers universal principles that apply whether you are learning how to install a VFD in a workshop (230V compact drive) or in an industrial facility (6.6kV medium-voltage drive). For a deep, step-by-step low-voltage walkthrough (220V-690V) with terminal-by-terminal wiring instructions, see our dedicated low-voltage VFD installation guide. This article focuses on cross-voltage best practices that protect any installation.
Key Takeaways
- Roughly 80% of VFD field issues come from grounding and shielding mistakes, not drive defects.
- Keep VFD-to-motor cable runs below 30 meters when possible, and always use VFD-rated cable with 360-degree shield bonding.
- Bond motor cable shields at both ends to drain high-frequency noise; ground control shields at the drive end only.
- A 3-5% line reactor can cut input current THD by 30-50% and protect the drive from line transients.
- Use three commissioning checklists: pre-power, first-start, and load-test.

VFD installation best practices turn a boxed drive into a dependable motor control system. They cover mechanical mounting, power wiring, grounding, electromagnetic compatibility (EMC), control wiring, and commissioning.
These practices matter because a VFD does not just feed power to a motor. It switches voltage thousands of times per second. Those fast switching edges create high-frequency noise, voltage reflections, and harmonic currents. A proper installation contains that noise and protects every device on the same network.
A poor installation rarely fails immediately. It fails after weeks or months of hidden stress. The costs can include:
One overlooked detail, such as an unbonded cable shield or a missing line reactor, can create a problem that looks like a drive fault but is actually an installation fault.
Installation becomes a system issue when the VFD is not treated as part of a larger electrical ecosystem. The drive, motor, cables, grounding system, protective devices, and nearby control equipment all interact. A decision made in one area affects the others.
For example, running a 60-meter motor cable without an output filter may save money today but destroy a motor bearing within a year. Saving a few dollars on cable can cost thousands in downtime and replacement. This is why installation best practices should be planned before the drive is even unboxed.
If you are still selecting the drive itself, our guide on how to choose a VFD can help you match voltage, power, and control requirements before installation begins.
VFD installation best practices start before the drive is mounted. Assess the environment first. Heat, dust, moisture, vibration, and corrosive gases all shorten VFD life. Most premature drive failures start with poor site conditions, not poor drive quality.
Check the following before the drive leaves its box:
If conditions are harsh, choose a drive with the right IP rating and cooling strategy. Our drives are built for demanding environments with protection and cooling options that match the site.
Match the enclosure to the environment. Common ratings include:
Clearance is just as important as the rating. VFDs need airflow across their heatsinks. Follow the manufacturer’s minimum clearances above, below, and in front of the drive. Stacking drives too closely causes thermal stacking and early failure.
VFDs typically dissipate 2-4% of rated power as heat. A 100 kW drive can reject 2-4 kW of heat into the cabinet. Calculate total heat load from all drives, contactors, and transformers, then size ventilation or air conditioning accordingly.
For natural convection, ensure intake vents are low and exhaust vents are high. For forced ventilation, filter incoming air and keep the cabinet slightly positive to reduce dust ingress. Always check that cooling airflow is not blocked by cables or ducts.

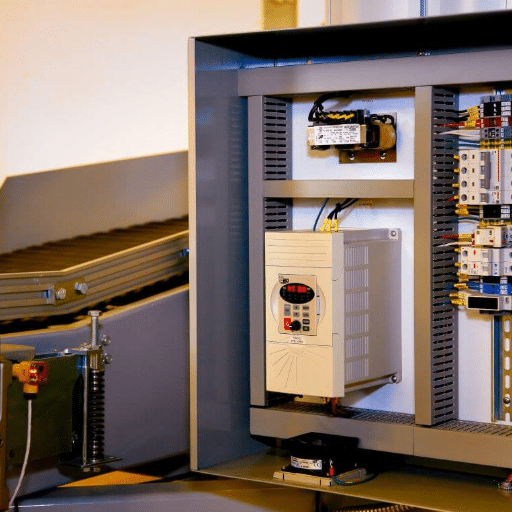
Power wiring is where most installation mistakes happen. The input side connects the drive to the supply. The output side connects the drive to the motor. Treat them differently.
Connect the supply to the input terminals marked R, S, T or L1, L2, L3. Use a dedicated disconnecting means upstream of the drive. The disconnect must be lockable and rated for the available fault current.
Install input fuses or a circuit breaker sized per the manufacturer’s recommendation. Standard thermal-magnetic breakers may not protect the drive’s rectifier semiconductors. Semiconductor fuses or drive-rated breakers are preferred.
Add a line reactor when any of the following are true:
A 3-5% line reactor can reduce input current total harmonic distortion (THD) by 30-50%, easing stress on capacitors and improving compliance with IEEE 519.
Connect the motor to the output terminals U, V, W. Never connect line power to these terminals. Doing so destroys the inverter stage.
Use a dedicated cable from the VFD output directly to the motor terminal box. Avoid intermediate junction boxes when possible. If a contactor is required between the drive and motor, it must be closed or opened only when the drive is stopped. Switching a running motor under VFD output is dangerous and will damage the drive.
Never install power-factor correction capacitors between the VFD and motor. Capacitors on the output side create resonance and can overcurrent the drive.
Size input and output cables based on the drive’s rated input and output current, not just motor nameplate current. VFD output currents contain harmonic components and may run warmer than a sinusoidal current in the same conductor.
Follow NEC Article 430, IEC 60204-1, or your local electrical code for conductor sizing and protection. In general:
For sizing help, see our VFD sizing guide.
Segregate power and control cables. Power cables on the input and output sides carry high-frequency noise that can couple into nearby signal cables. Best practice is:
Maintaining this separation is one of the simplest ways to avoid EMC problems in the field.
VFD grounding is not just a safety requirement. It is the primary path for high-frequency noise to return to its source. Poor grounding creates ground loops, radiated emissions, and equipment damage.
Connect the protective earth (PE) terminal of the VFD to a dedicated low-impedance earth bus. Use a star grounding arrangement: each piece of equipment has its own PE conductor back to a central ground point. Avoid daisy-chain grounding, where one device’s ground depends on another device’s ground connection.
Daisy-chain grounding increases impedance and lets noise circulate between devices. Star grounding keeps each ground path short, direct, and independent.
Motor cable shields must be bonded to ground at both the drive end and the motor end. Use 360-degree circumferential clamping, such as a cable gland with an EMC clamp or a metallic cable tray bonded at both ends. Pigtails and drain wires create high impedance at high frequencies and should be avoided on motor cable shields.
The shield’s job is to carry common-mode currents back to the drive without letting them radiate into the cabinet or building wiring. A proper bond at both ends gives those currents a controlled return path.
Control cable shields are handled differently from motor cable shields. For analog signals and low-voltage I/O, ground the shield at the drive end only unless the manufacturer specifies otherwise. Grounding at both ends can create ground loops when there is a voltage difference between the drive cabinet and the remote device.
For high-speed communication cables, follow the manufacturer’s grounding recommendation. Many fieldbus and encoder cables require grounding at one end with a dedicated ground clip.
VFD output creates common-mode voltage on the motor shaft. Without a discharge path, that voltage can exceed the dielectric strength of bearing grease and pit the bearing races. This is called electrical discharge machining (EDM) current, and it can damage motor bearings within 6-12 months.
Protect bearings by:
A 360-degree shield bond plus a shaft grounding ring is the most cost-effective way to avoid repeat bearing failures.

Not all motor cables work with VFDs. Standard power cable may work for short runs, but VFD-rated cable is the safer choice for reliable long-term operation.
VFD-rated cable has three key differences from standard motor cable:
Using unshielded tray cable or building wire for a VFD output is a common source of EMI complaints and premature cable failure.
Voltage reflections increase with cable length. As a practical rule, keep VFD-to-motor cable runs below 30 meters when possible. Longer runs are common, but they require extra care.
Typical manufacturer guidance is:
| Motor Cable Length | Recommended Action |
|---|---|
| Up to 30 m | VFD-rated cable, shield bonded at both ends |
| 30-100 m | Add a dV/dt filter or an output reactor |
| 100-150 m | Sine wave filter strongly recommended |
| Above 150 m | Consult the manufacturer; you may need a load reactor or motor termination |
Exact limits vary by drive size, switching frequency, and cable type. Always check the drive manual. For more cable-length guidance, Greenpeg publishes practical limits for common installations.
Add an output filter when cable length, motor age, or EMC class requires it. Older motors with lower insulation grades benefit from filters even on short cable runs. Critical applications with sensitive nearby electronics also benefit from the reduced emissions that filters provide.
Filters and reactors are not always required, but they are the right answer in many installations. Choosing the wrong one wastes money. Choosing none when one is needed risks equipment life and breaks VFD installation best practices for long-term reliability.
A line reactor is an inductor on the drive input. It slows the current rise time and reduces harmonic current injection into the supply. It also protects the drive from voltage spikes and phase imbalance.
Use a line reactor when:
A dV/dt filter is an inductor on the drive output. It slows the voltage rise time at the motor terminals, reducing voltage reflections and motor insulation stress. It also helps reduce bearing currents.
Use a dV/dt filter when:
A sine wave filter is a more aggressive output filter that reconstructs a near-sinusoidal voltage waveform at the motor. It is larger and more expensive than a dV/dt filter but provides the best motor protection.
Use a sine wave filter when:
An active harmonic filter measures harmonic currents and injects counter-phase currents to cancel them. It is used at the switchboard level to meet strict harmonic standards such as IEEE 519.
Use an active harmonic filter when:
| Situation | Recommended Filter | Why |
|---|---|---|
| High short-circuit capacity, shared transformer | Line reactor | Reduces input harmonics and protects the rectifier |
| Cable 30-100 m, standard inverter-duty motor | dV/dt filter | Controls voltage reflections and bearing currents |
| Cable >100 m, old motor, or multiple motors | Sine wave filter | Reconstructs sinusoidal motor voltage |
| Facility-wide harmonic compliance issue | Active harmonic filter | Cancels harmonics at the distribution level |
| EMC-sensitive environment near the drive | Shielded cable + dV/dt filter | Reduces radiated and conducted emissions |
The key is to match the filter to the real problem. Adding a sine wave filter to a short cable run is overkill. Skipping a dV/dt filter on a 90-meter run is underkill.

Control wiring carries the commands and feedback that make the VFD useful. It is also the most sensitive to noise. Treat control wiring with the same discipline as power wiring to keep your VFD installation best practices consistent end to end.
Use shielded twisted-pair cable for analog signals such as 0-10V or 4-20mA speed references. Route these cables away from the motor and power cables. Ground the shield at the drive end only unless the manufacturer recommends otherwise.
Digital inputs are less sensitive than analog inputs but still benefit from separation. Use separate control terminals for start, stop, direction, and enable. Avoid mixing 24V control signals with AC power in the same conduit.
Follow the fieldbus standard for cable type, termination, and grounding. For Modbus RTU, use shielded twisted-pair cable, terminate the network at both ends, and keep total cable length within the protocol limit. Ground the shield at one end, typically the master or drive end.
Do not run fieldbus cables in the same tray as VFD output cables. Even brief parallel runs can cause communication errors that are difficult to diagnose.
Encoder cables are the most sensitive of all. Use manufacturer-recommended shielded cable. Keep cable lengths short. Bond the shield with a proper EMC clamp. Never use pigtails or twist the shield into a wire and ground it at a terminal.
For long encoder runs, use differential line-driver encoders and terminated receiver circuits. Single-ended encoders do not tolerate noise well over distance.
If you are setting control parameters after wiring, our VFD parameter settings guide walks through the key entries.
Commissioning is the bridge between installation and operation. A structured startup catches wiring errors before they cause damage. Use three distinct checklists.
Before applying power, verify:
When power is applied for the first time:
If any fault appears, resolve it before proceeding. Do not bypass protection settings to force operation.
After first power-up, run no-load tests:
Then move to load testing:
Good commissioning ends with documentation. Record:
Hand over this package to the maintenance team. Drives that are well-documented are serviced faster and experience less downtime.
For a broader commissioning workflow, see our VFD commissioning steps.

Even experienced installers make these mistakes when applying VFD installation best practices. Learn to recognize and avoid them.
Mistake 1: Daisy-chain grounding
Each device should have its own dedicated ground conductor. Daisy-chaining increases impedance and lets noise circulate.
Mistake 2: Unshielded or wrong motor cable
Standard building wire does not contain VFD high-frequency noise. Use VFD-rated cable with a continuous shield.
Mistake 3: Power and control cables in the same conduit
This causes erratic speed references, PLC lockups, and nuisance trips. Keep them separated.
Mistake 4: Missing output filter on long cable run
Long motor cables without filters lead to voltage reflections and bearing currents. Add the right filter for the cable length.
Mistake 5: Wrong fuse or breaker type
Standard breakers may not protect drive semiconductors. Use drive-rated fuses or breakers.
Mistake 6: Skipping auto-tune
Many modern drives can auto-tune motor parameters. Skipping this step leaves the torque response and protection settings inaccurate.
A machine builder in Germany learned about Mistake 3 the hard way. He installed a 22 kW servo VFD on a CNC milling station and ran the encoder cable in the same tray as the motor cable. The drive ran, but the servo axis drifted randomly, producing scrap parts. After separating the encoder cable from the motor cable, adding a shielded encoder cable with the shield grounded at the drive end, and installing a dV/dt filter, the drift disappeared. The fix cost about EUR 220 and two hours. The scrap savings paid for it in one shift.
A mining operator in South Africa saw Mistake 4 in action. A 400 kW medium-voltage VFD was installed on a conveyor with a 120-meter motor cable and no output filter. Within six months, the motor bearings failed from EDM currents. Adding a sine wave filter, insulated bearings on the non-drive end, and a shaft grounding ring extended motor life and eliminated repeat failures.
In Brazil, a textile contractor combined several errors on a multi-drive expansion. Eight low-voltage VFDs shared one transformer without line reactors, and their control wiring ran in the same conduits as power cables. Nuisance trips, erratic speed reference, and voltage THD above 8% plagued the plant for weeks. Adding 3% line reactors, separating power and control cabling, and grounding shields correctly resolved all issues in two days.
If you are diagnosing an existing problem, our VFD troubleshooting common issues guide can help isolate the cause.
The most common mistake is poor grounding or shielding. Roughly 80% of field problems trace back to these two issues, often showing up as nuisance trips, EMI, or bearing damage rather than a direct ground fault.
As a general rule, keep the VFD-to-motor cable below 30 meters. Runs of 30-100 meters usually need a dV/dt filter or output reactor. Runs above 100 meters typically require a sine wave filter or manufacturer consultation.
Yes. Motor cable shields should be bonded at both the drive end and the motor end using 360-degree clamps. This gives high-frequency common-mode currents a controlled return path and reduces radiated emissions.
No. A line reactor is recommended when the supply transformer is large relative to the drive, when multiple drives share a transformer, or when voltage transients are common. It reduces input harmonics and protects the rectifier.
Match the enclosure to the environment. IP20 is fine for clean electrical rooms. IP54 or IP55 is better for dusty or wet industrial floors. For strict VFD EMC compliance, use sealed enclosures with proper cable entry glands and shield bonding plates. Always follow the drive manufacturer’s temperature and clearance requirements.
Yes, but it requires a sine wave filter and careful parameter settings. Each motor needs its own overload protection because the VFD cannot protect multiple motors individually. This is sometimes called a multidrop application.
VFD installation best practices are not optional details. They are the difference between a drive that runs for 15 years and one that fails in 15 months. The core principles apply across every voltage class: mount with proper cooling, wire with VFD-rated cable, ground with a star topology, bond shields correctly, add filters when cable length or harmonics demand them, and commission with structured checklists.
Learning how to install a VFD correctly starts with the site assessment. Confirm the environment, enclosure, and cooling before the drive is mounted. Then wire power and control circuits with separation and shielding in mind. Finish with pre-power, first-start, and load-test checklists, and leave the site with complete documentation.
If you need application-specific guidance, our team can help you select the right VFD, accessories, and installation approach for your project. Explore our VFD drives or contact our engineers to discuss your requirements.